搜索到
12
篇与
vue
的结果
-
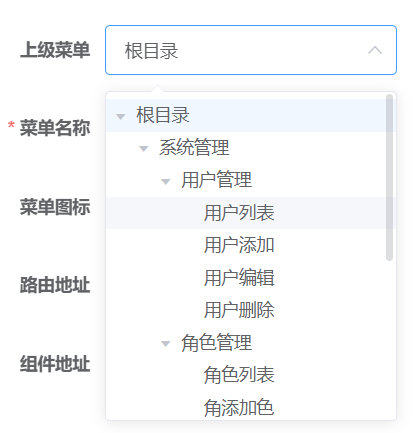
 el-select下拉树的实现 el-select实现下拉树// template<el-select ref="el-select-ref" v-model="form.pid" @change="selectChange" @visible-change="showSelectTree" @clear="clearSelectTree" > <!-- 添加一个option选项 使用hidden隐藏 value是下拉选中的值,label是显示的名称 --> <el-option key="id" hidden :value="form.pid" :label="form.pidName" /> <el-tree ref="el-select-tree" :data="treeData" :props="defaultProps" node-key="menuId" highlight-current default-expand-all :expand-on-click-node="false" @node-click="handleNodeClick" /> </el-select>// script<script> export default { data() { return { tableData: [{ "menuId": 8, "pid": 0, "name": "系统管理", "children": [ { "menuId": 3, "pid": 8, "name": "用户管理", "children": [ { "menuId": 4, "pid": 3, "name": "用户列表", "children": [] }, { "menuId": 9, "pid": 3, "name": "用户添加", "children": [] }, { "menuId": 10, "pid": 3, "name": "用户编辑", "children": [] }, { "menuId": 11, "pid": 3, "name": "用户删除", "children": [] } ] }, { "menuId": 12, "pid": 8, "name": "角色管理", "children": [ { "menuId": 17, "pid": 12, "name": "角色列表", "children": [] }, { "menuId": 18, "pid": 12, "name": "角添加色", "children": [] }, { "menuId": 19, "pid": 12, "name": "编辑角色", "children": [] }, { "menuId": 20, "pid": 12, "name": "删除角色", "children": [] } ] }, { "menuId": 7, "pid": 8, "name": "字典管理", "children": [] }, { "menuId": 2, "pid": 8, "name": "菜单管理", "children": [ { "menuId": 13, "pid": 2, "name": "菜单列表", "children": [] }, { "menuId": 14, "pid": 2, "name": "添加菜单", "children": [] }, { "menuId": 15, "pid": 2, "name": "编辑菜单", "children": [] }, { "menuId": 16, "pid": 2, "name": "删除菜单", "children": [] } ] }, { "menuId": 21, "pid": 8, "name": "聚合图床", "icon": "tree", "children": [] } ] }], form: { pid: 0, pidName: '根目录' }, defaultProps: { children: 'children', label: 'name' } } }, methods: { showSelectTree(bool) { // el-select下拉框显示或隐藏触发 // 设置当前绑定的tree节点高亮 if (bool) this.$refs['el-select-tree'].setCurrentKey(this.form.pid) }, handleNodeClick(data, node, nodeRef) { // 点击tree下拉节点 // console.log(data, node, nodeRef) this.form.pid = data.menuId // 设置el-select绑定的value this.form.pidName = data.name // 设置el-select绑定的lable this.$refs['el-select-ref'].handleClose() // 关闭el-select下拉框 // this.$set(this.form, 'pid', data.menuId) }, clearSelectTree() { // 清空el-select触发 需要给el-select添加 clearable属性 this.form.pidName = '' this.$refs['el-select-tree'].setCurrentKey(null) }, } } </script>实现效果展示如需封装成组件,可以自行进行封装,这里就不再进行组件封装
 -
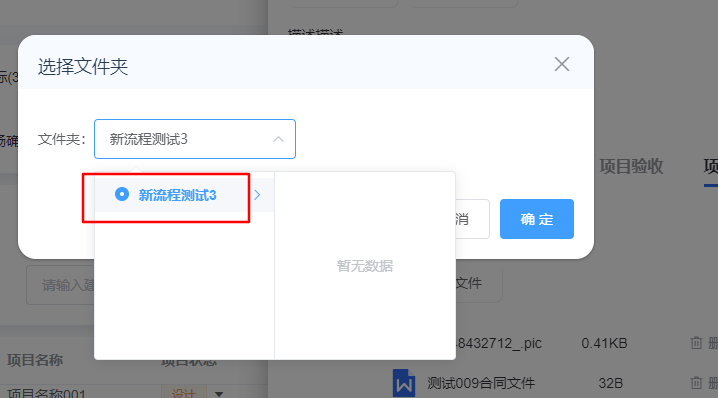
 el-cascader选择任意一级搭配懒加载使用,单选框radio不会触发懒加载 1. 问题如图单选按钮点击后,没有进行懒加载,直接显示空数据2. 解决给el-cascader绑定change事件,手动调用lazyLoad方法<!-- 选择文件夹 --> <el-dialog title="选择文件夹" :visible.sync="dialogVisible" width="30%" append-to-body > <div class="" v-if="dialogVisible"> <span>文件夹:</span> <el-cascader class="cyupload-cascader" ref="folder-cascader-ref" :props="props" :show-all-levels="false" @change="change" clearable > </el-cascader> </div> <span slot="footer" class="dialog-footer"> <el-button @click="dialogVisible = false">取 消</el-button> <el-button type="primary" @click="sureBtn">确 定</el-button> </span> </el-dialog>// 级联状态变化 change (val) { // console.log(val); console.log(this.$refs['folder-cascader-ref'], 'ref'); this.folderId = val[val.length - 1] // this.$refs['folder-cascader-ref'].dropDownVisible = false // 关闭面板 const selectNode = this.$refs['folder-cascader-ref'].getCheckedNodes()[0] // node节点 if (selectNode && !selectNode.loaded) this.$refs['folder-cascader-ref'].$refs['panel'].lazyLoad(selectNode) // 选中加载 },3. 成功效果图
 -
 后端数据大数字精度缺失问题 1. 使用json-bigintnpm i json-bigint2. 如何使用import axios from 'axios' import jsonBig from 'json-bigint' // create an axios instance const service = axios.create({ baseURL: process.env.VUE_APP_BASE_API, // url = base url + request url // withCredentials: true, // send cookies when cross-domain requests timeout: 5 * 1000, // request timeout // 在响应数据前处理该数据 transformResponse: [function (data) { try { // 如果转换成功则返回转换的数据结果,会将大数字转换为bigint console.log(jsonBig.parse(data), 888); return jsonBig.parse(data) } catch (err) { // 如果转换失败,则包装为统一数据格式并返回 return { data } } }] })2. 使用时,将该字段转换为字符串res.data.pid.toString() // 4125411516516488
 -

-
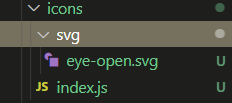
 如何在vue中优雅的使用svg 1. svg-sprite-loadernpm install svg-sprite-loader --save2. 在src中新建文件夹iconsicons/svg 存放svg图标icons/index.js 全局注册svg组件,导入所有svg图标// icons/index.js import Vue from 'vue' import SvgIcon from '@/components/SvgIcon/index.vue'// svg component // register globally Vue.component('SvgIcon', SvgIcon) const req = require.context('./svg', false, /\.svg$/) const requireAll = requireContext => requireContext.keys().map(requireContext) requireAll(req)3. 创建svg组件// src/components/ScgIcon/index.vue <template> <svg :class="svgClass" aria-hidden="true" v-on="$listeners"> <use :xlink:href="iconName" /> </svg> </template> <script> export default { name: 'SvgIcon', props: { iconClass: { type: String, required: true }, className: { type: String, default: '' } }, computed: { iconName () { return `#icon-${this.iconClass}` }, svgClass () { if (this.className) { return 'svg-icon ' + this.className } else { return 'svg-icon' } } } } </script> <style scoped> .svg-icon { width: 1em; height: 1em; vertical-align: -0.15em; fill: currentColor; overflow: hidden; } </style> 4. 在vue.config.js中使用loaderconst path = require('path') function resolve (dir) { return path.join(__dirname, dir) } module.exports = { devServer: { port: 8080, open: true }, chainWebpack (config) { // set svg-sprite-loader config.module .rule('svg') .exclude.add(resolve('src/icons')) .end() config.module .rule('icons') .test(/\.svg$/) .include.add(resolve('src/icons')) .end() .use('svg-sprite-loader') .loader('svg-sprite-loader') .options({ symbolId: 'icon-[name]' }) .end() } }5. 在main.js中导入icons/index.js// main.js import '@/icons/index' // svg6. 在页面中使用组件<SvgIcon iconClass="eye-open"></SvgIcon>直接使用svg文件名作为iconClass
 -
 el-upload自定义触发按钮及触发上传前判断 1. 在页面中引用el-upload组件<!-- 自定义按钮div --> <div v-if="routerList.length !== 1" class="action upload" :class="{action_upload_radius: routerList.length === 1}" @click="uploadHandler" > <i class="el-icon el-icon-upload"></i>上传 </div> <!-- hidden upload --> <el-upload v-show="false" class="upload-demo" :action="uploadUrl" :on-success="actionUploadSucc" :show-file-list="false" :headers="headers" :data="actUploadParams" :multiple="false" :file-list="fileList"> <el-button ref="file-home-uploadBtnRef" v-show="false"> <i class="el-icon-upload"></i>上传文件 </el-button> </el-upload>使用一个div模拟一个上传按钮,使用v-show隐藏upload组件,在upload组件的触发按钮el-button上绑定ref2. 触发前条件判断及触发upload上传方式 // action bar 上传btn uploadHandler () { console.log(this.routerList); const len = this.routerList.length if(this.routerList.length === 1) return this.$message.info('请先进入文件夹!') const currFolderId = this.routerList[len-1].folderId // 当前操作的文件夹id this.actUploadParams.folderId = currFolderId // 触发upload组件上传 this.$refs['file-home-uploadBtnRef'].$el.click() },获取到upload触发按钮el-button的ref,在获取到ref上的$el,调用click()自点击触发upload上传
 -
 移动端适配(rem) 1. postcss-pxtorem该插件可以将项目中的px值转化为rem,注意:行内样式不会转化npm install postcss-pxtorem -D在项目根目录创建文件 .postcssrc.js 或 postcss.config.js// postcss.config.js module.exports = { plugins: { // 用到的插件都配置在这里 'postcss-pxtorem': { rootValue: 37.5, // 1rem = 37.5px rem基准值 750设计稿就改为 75 propList: ['*'], // 配置要转换的css属性 * 表示所有属性 }, }, }; module.exports = { plugins: { // postcss-pxtorem 插件的版本需要 >= 5.0.0 'postcss-pxtorem': { rootValue({ file }) { // Vant中是根据375来写 如果我们的不是,就需要使用 函数的形式做判断 return file.indexOf('vant') !== -1 ? 37.5 : 75; }, propList: ['*'], }, }, };2. lib-flexible该插件可以根据屏幕动态的设置html的font-size大小默认会将屏幕分成十份,然后给html的font-size, 比如屏幕宽度 750px 那么html的font-size就是 75px1rem = 75pxnpm install lib-flexible// 在main.js中导入 import 'amfe-flexible'
 -
 封装localStorage本地存储 封装本地存储是为了更好更方便的实现本地存储,简洁明了实现本地存储的步骤1. 首先创建枚举列表,用来记录本地存储的键,可以清楚地知道,你本地都存了啥// storageEnum枚举列表 const storageEnum = { user: ['user', '用户'], // key:简写名称 value array[0]: 本地存储的键名, array[1]:描述是干嘛的 userToken: ['user::access_token', '用户token'], userInfo: ['sc_selfInfo', '用户信息'], cart: ['cart', 'cart购物车'], } module.exports = storageEnum2. 定义枚举工具/** * 枚举定义工具 * 示例: * const AA = createEnum({ * b: [1, '审核中'], * C: [2, '审核通过'] * }) * 获取枚举值:AA.b * 获取枚举描述:AA.getDesc('b') * 通过枚举值获取描述:AA.getDescFromValue(AA.b) * */ export function createEnum(definition) { const strToValueMap = {} const numToDescMap = {} for (const enumName of Object.keys(definition)) { const [value, desc] = definition[enumName] strToValueMap[enumName] = value numToDescMap[value] = desc } return { ...strToValueMap, getDesc(enumName) { return (definition[enumName] && definition[enumName][1]) || '' }, getDescFromValue(value) { return numToDescMap[value] || '' } } }3. 封装本地存储方法/* * @param param {Object} key值为 method name data */ Vue.prototype.$storageEnum = (param) => { let that = this; let { method, // get / set name, // 存储storageEnum的键名简写 data // 要存储的数据 } = param let storagelist = createEnum(storageEnum) let storageAction = new Map() .set('set', () => { uni.setStorageSync(storagelist[name], data) }) .set('get', () => { return uni.getStorageSync(storagelist[name]); }) try { return storageAction.get(method)(); } catch (e) { uni.showToast({ icon: 'none', title: `<${name}>缓存,使用错误请检查!` }); } }4. 使用this.$storageEnum({ method: 'set', name: 'userInfo', data: { username: 'zs', age: 18 } })
 -
 vue配置二级目录以及nginx多网站部署 1. 在vue.config.js配置publicPath二级目录module.exports = { publicPath: '/adm/', // 二级目录名称 }2. 在router中配置baseconst router = new VueRouter({ mode: 'history', // base: process.env.BASE_URL, base: '/adm/', // 二级目录 routes })3. nginx多网站配置 根据location部署// 在nginx.conf文件中配置 server { listen 80; server_name localhost; location / { // 前台网站 访问 127.0.0.1 root dist; // 根目录下直接放了一个dist前端代码 index index.html index.htm; try_files $uri $uri/ /index.html; // 刷新空白 } location /adm { // 后台网站 访问 127.0.0.1/adm alias adm/dist; // 根目录下adm文件夹下有一个dist前端代码 index index.html index.htm; try_files $uri $uri/ /index.html; } }注意:nginx配置二级目录要使用alias不能使用root前台测试地址: https://cyblog.wrz521.top后台测试地址:https://cyblog.wrz521.top/adm
 -
 vue路由传参的几种方式 路由跳转的两种方式1. 声明式导航使用router-link的to属性进行路由跳转 to的值是要跳转到的那个路由// 1.1 to后直接跟路由 <router-link to="/home">to home</router-link> // 1.2 to后跟一个配置对象path属性是要跳转到的那个路由 <router-link :to="{ path: '/home' }">to home</router-link> // 1.3 to后跟一个配置对象,使用命名路由的name进行跳转 <router-link :to="{ name: 'homeIndex' }">to home</router-link>查询字符串形式 路由传参 to的值是一个配置对象 以查询字符串形式携带 url?id=123// 2.1 以 url?id=123&name=zs的形式携带 <router-link :to="{ path: '/home?id=123' }">to home?id=123</router-link> // 2.2 以query属性进行传参 <router-link :to="{ path: '/home', query: { id: 123 } }">to home 以query携带</router-link> // 2.3 以params进行传参 需要命名路由name <router-link :to="{ name: 'userIndex', params: { id: 123 } }">to user 以params携带</router-link>2. 编程式导航使用this.$router进行跳转 $router可以访问到路由的实例this.$router.push('/home') this.$router.push('/home?id=123') // 携带query参数 this.$router.push({ path: '/home', query: { id: 123 } }) // 携带query参数 this.$router.push({ name: 'homeIndex', params: { id: 123 } }) // 携带params参数 需要和命名路由搭配使用$router实例的跳转方法push() // 跳转到指定的路由,向history历史中添加记录,点击返回,返回到来之前的路由。 go(n) // 向前前进 n 或 后退 n个路由 n可为负数 replace() // 跳转到指定的路由,但是不会在history中添加记录,点击返回,会跳转到上上一个路由。 back() // 后退 forward() // 前进


